I always talk about reviews and how-to stuff. Today I will teach you how to clean your paint sprayers. For newbies, this post is gonna be very helpful.
Professionals might get help at some point and also leave their tips in the comment section so others can get help.
When you think about a paint sprayer, chances are the first thing that comes to mind is how easy it would be to finish painting your house in mere hours professionally!
With just one tool, you can do all sorts of different things including priming, finishing, touching up and even for odd jobs that other painting tools just wouldn’t work for.
Newbies always get confused whenever they think about cleaning their paint sprayer after completing the work.
Well, here it is for you people out there who are confused. In this post I am going to explain each and every point from my experience on how to clean a paint sprayer
When faced with differing approaches to cleaning different types of paint guns, deciding which one is best can be a mystifying task.
The process for cleaning each gun’s parts vary both in the order of steps and with different variations for the same steps.
I’ve tried to simplify things by creating this handy guide to remove any confusion that might arise.
While our HVLP and airless sprayer content focus mainly on painting outside with an extension pole and concentrator nozzle, it’s also easy enough to use these guides inside.
How to clean a paint sprayer
Cleaning the sprayers with a water-based solution
Water-based paint is designed to be used on different types of surfaces. It can be applied interior and exterior around the house.
But if you’re painting a room with water-based paint.
It’s important to clean up after yourself because both you, your items, and the room itself could potentially get messy all over again.
Cleaning a spray gun after use with water-based paints may be straightforward, but it’s not always easy.
Using the wrong technique can make life difficult, and it’s best to have all the correct information from the beginning.
Things required to clean the sprayer
These are the things that I personally use to clean my all sprayers after testing them or after completing the project.
These things are very important for cleaning the paint sprayers so keep the process in mind because it’s very important.
- Some Water
- Dish detergent Is an optional thing to consider
- Sprayers
- Brush to clean the sprayer paint residue
- A gun wrench
- Buckets.
Method to clean the paint sprayer
Read the instructions carefully which I am gonna share with you guys. Especially the newbies should follow each and every point.
Professionals can give some tips from their experience in the comments section which can be helpful for the amateur guys out there.
Unplug the machine from the power outlet. Gently press the trigger. So that any remaining medium in the system is evacuated.
Then loosen the paint cup and pour any coating left in it into your original tin so as to not waste it.
It’s important to clean the paint cup and the inside of it then connect it back to newly filled water.
Remember to liberate about half a cup of fresh clean H2O for refilling its tank (don’t cut this part out — this is how you refill your unit with time).
Although the previous steps were enough to get you started, it is recommended that you do a safe shutdown through the main control panel at least once every month.
This will help keep dust and other particles out of your power supply. To do so, simply follow the manufacturer’s instructions.
Once you’re finished painting, take apart the spray gun. Some models, like the FLEXiO 5000 by Wagner.
Require very little effort to disassemble and this extensive amount of preparation for a quick assembly once done will ensure seamless paint beyond the range of your finger!
Gently start brushing each individual piece with a toothbrush or dedicated cleaning brush.
Start with the smaller, more fiddly items first (see below for a detailed description of how to clean spray gun nozzles and hoses). Then gradually work up to the larger components.
It’s very important to make sure the paint sprayer is totally clean before storing it away.
Cleaning of oil-based paint from the spray gun
The best way to clean an oil-based paint sprayer is to use a solvent that is safe to use on the sprayer and is also effective on oil-based paint.
Never use water or a detergent to clean a sprayer! The safest bet is to use an appropriate degreaser or paint thinner.
You can try soaking the gun in some mineral spirits and shaking it to loosen the paint.
Maybe you can take the nozzle off and soak it in mineral spirits, then try to clean the nozzle by blowing compressed air through the hole where the paint comes out.
It might help. I wouldn’t expect much, but it’s worth a try.
As far as the collection hose, you can try soaking it in mineral spirits and running it through a commercial dryer, then blowing air through it.
If you can’t get it all out, then you’ll probably have to replace the hose with a new one.
To clean an HVLP paint sprayer used for oil-based coatings, the process is similar to that described above for cleaning tools used with water-based paints.
The only item that needs to be changed is the water (with optional soap) — replacing it with something like acetone, mineral spirits, or thinner.
It’s important to note that some surfaces (such as wood), may need a slightly different approach: you might try sanding areas down first, before cleaning and painting them.
Method to clean dried paint from paint sprayer
How to Remove Dried Paint from a Spray-Gun Much like your mother used to tell you to – clean up after yourself!
Never leave this fun pastime until the next day or night, as doing so could lead to some serious cleaning or reworking.
Not only that, but if left unattended, the paint will dry over time and become nearly impossible to remove.
Which is going to be an even greater inconvenience when you find out that the job was half done –or it just has to be done again completely.
Therefore, I suggest that after every usage session with your sprayer gun, leaving dried paint behind isn’t one of them. And clean the sprayer.
Things required to clean the paint sprayer
- Paint sprayer
- Cleaning brush (I recommend a soft one)
- Large pails filled with water
- Hose (can be garden hose)
- Pliers
- Paint thinner if budging
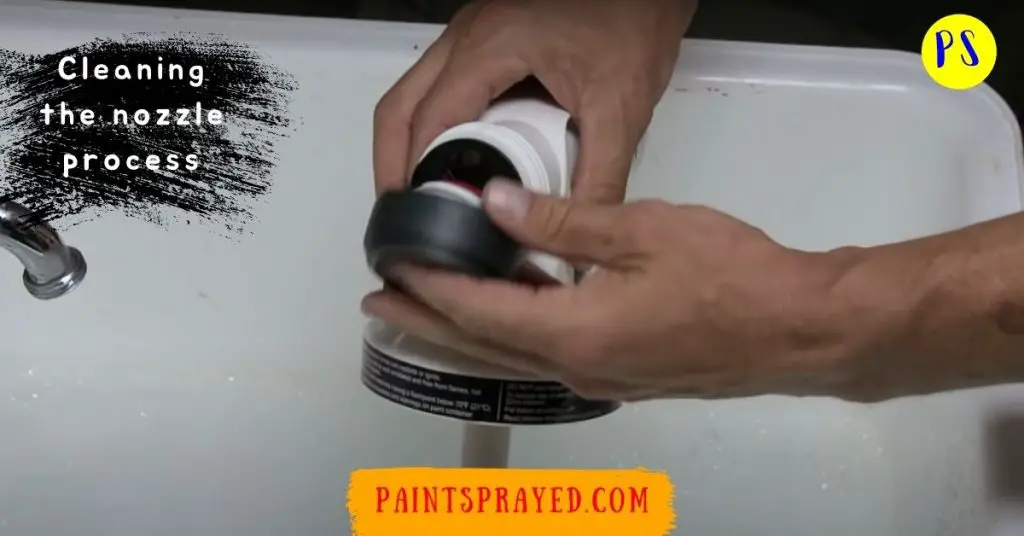
Cleaning the nozzle process
Before starting to clean the nozzle, make sure that it is blocked with congealed paint.
Then take your hose and slightly dampen the tip as this will be enough to encourage the movement of dried remains.
Using a soft cleaning brush, gently scrub away any coating that you can manage with ease. The opening of the tip can then be shiny and free of obstructions again.

If you’re experiencing any difficulty with this, take care in using pliers to carefully remove any larger chunks of paint that may have dried onto the nozzle of the sprayer.
Removing these excess paints can help promote a successful next coat to cover any visible marks on the surface.
Cleaning of filters
Cleaning the filter and internals is necessary to maintain your kombucha maker. Firstly, gently remove any debris that’s held in the filter and rinse thoroughly.
Next, to double-check that you have cleaned out all clogs, transfer some filtered water into the sprayer and check whether it changes color or whether water runs through easily.
If not, unclog by rinsing with a gentle stream of water from your faucet.
There’s a filter inside the handle which stops drips from appearing. If you take it out, you’ll find that the filter is covered in paint- this means that it was doing its job!
However, since it receives the greatest amount of paint and due to physics, it’ll be hard to flush out all the paint.
Over time, it is crucial to clean the filter on your spray gun.
This will ensure that you always have a steady stream of coating being pushed through it rather than clogging up and compromising the quality of your paint job.
Priming sprayer with water
Priming the pump sprayer with water before using a coating or paint product is one of the most important steps when it comes to avoiding problems.
Priming the pump sprayer helps to prevent any air pockets from inside the tubing, and you’ll have an easier time spraying if there aren’t any hollow spaces within your nozzle.
It’s imperative that you also clean the inlet strainer — situated at the entrance of the uptake hose — as there is a good chance that dried coating will be lingering here too.
Hopefully, the majority of the coating would have been removed with the water priming process, but on the off chance that some remains, gently scrub with a soft cleaning brush.
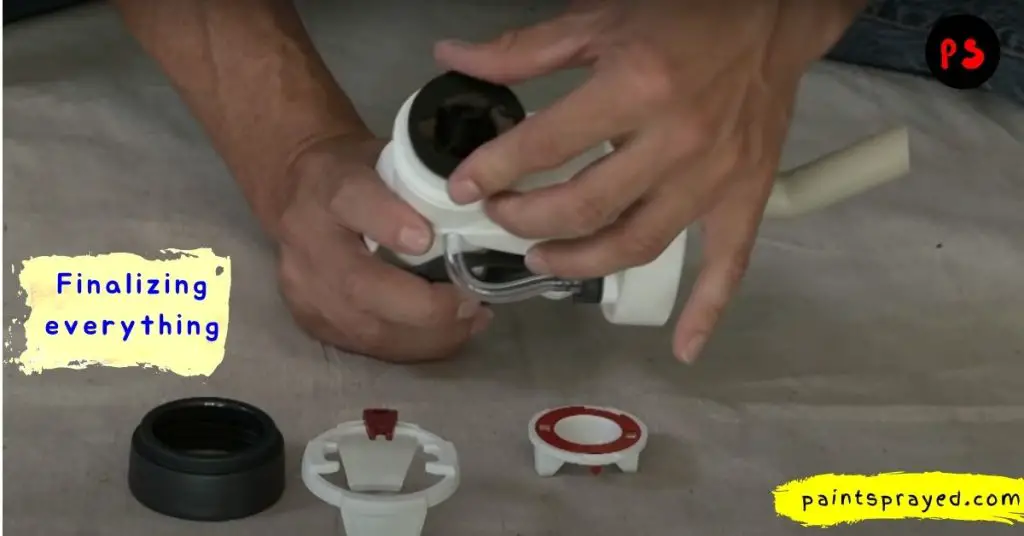
Finalizing everything
One thing to look for after washing a paint sprayer is dry residual coating flakes stuck in the screen.
This can happen when the valves are replaced during cleaning and the small openings are left open -allowing residual fumes to escape and residue bits to build up.
To be sure that any leftover coating is removed, make sure to do one more flow test after cleaning just in case.

Cleaning of sprayer nozzle
Cleaning a paint sprayer nozzle after using it is a very important step that should be taken to ensure that your next time’s painting will be successful.
The problem, however, is that it is often times overlooked or ignored – and as a result, many people have to deal with clogging or clumpy paint in their work.
The nozzle/fluid tip is one of the most important parts of a spray gun – you can’t beat that fine atomization that makes projects and exterior jobs look smooth, even, and superior.
So, you should pay particular attention to this part when it comes to cleaning your paint gun.
Cleaning of airless paint sprayer
Although it is possible to clean an airless paint sprayer with a pressure washer, it is not very convenient.
This leaves the inside of the sprayer open to rust and damage, which will eventually cause it to malfunction.
Below are a few steps you can take to clean an airless paint sprayer.
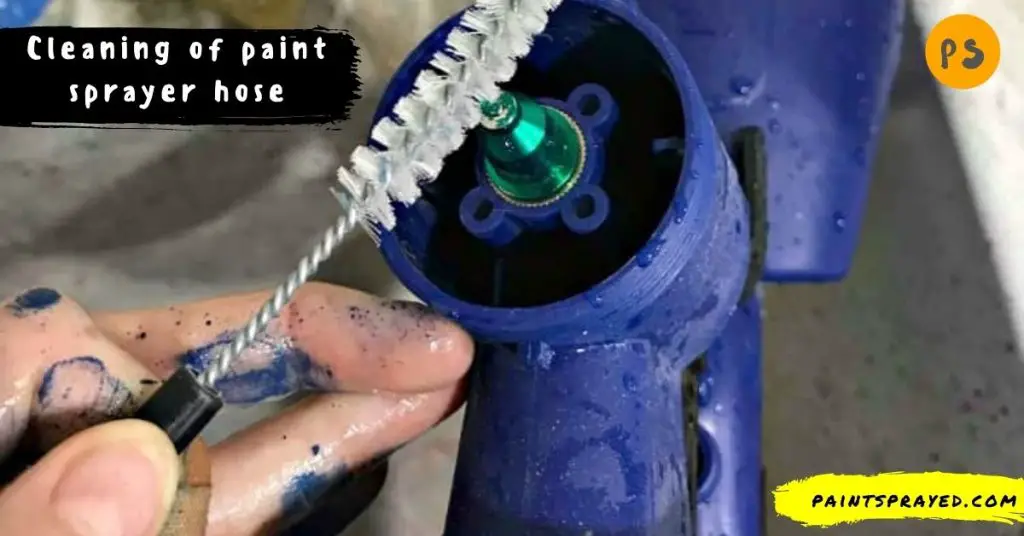
Cleaning of paint sprayer hose
To clean a paint sprayer hose, you need to place the hose into a small container of hot water and then allow it to soak for a few hours.
This will loosen up most of the build-up and paint in the hose. After the hose has soaked, use a small paint brush and scrub off the remaining build-up in the hose.
You will want to use a bit of soap or solvent during this step and then rinse the hose thoroughly with hot water.
The last step is to blow the hose out and allow it to dry overnight.
Using a compressor and blowing the hose out with air does wonders and makes the paint sprayer hose look new again.
To extend the life of your airless paint sprayer hose, you should follow similar steps to clean it at least monthly.
When you store your power washer, you’ll want to leave the garden hose unattached from the machine to avoid leaks and disconnections.
To clean a length of hose, place a funnel over one end and pour a bucket of hose solution down through it. Once finished, let the hose dry completely before reattaching it to your unit.

Cleaning with the help of kits and stations
The cleaning kits and stations are very important for the maintenance of paint guns.
There are various types of cleaning kits such as manual tube cleaning kits and piston-type cleaning kits.
The piston-type cleaning kit can be used for the easy and quick cleaning of the tube.
The piston cleaning kit can help to avoid the stains building up in the equipment which can lead to a bad effect on the painting process.
The cleaning stations are the best way to clean the paint equipment and maintain cleanliness.
This includes the tips and the filter of the paint equipment. This helps to avoid cross-contamination and the bad effect on the painting process.
What is the easiest way to clean a paint sprayer?
The easiest way to clean a paint sprayer is to use a cleaning solution specifically designed for the type of paint.
You were using and to follow the manufacturer’s instructions for cleaning the sprayer.
This often involves disassembling the sprayer and cleaning each component separately.
Additionally, it is important to clean the sprayer thoroughly after each use to prevent paint from drying and clogging the nozzle.
Can you run paint thinner through a paint sprayer?
It is not recommended to run paint thinner through a paint sprayer.
Paint thinner is a solvent that is used to clean and thin oil-based paints, and it can damage the internal components of a paint sprayer.
Additionally, paint thinner is flammable and can be dangerous if used in an enclosed space or with an electric paint sprayer.
It is recommended to use cleaning solutions specifically designed for the type of paint you were using, water or mineral spirits for cleaning the paint sprayer.
These cleaning solutions are less harsh on the internal components and safer to use.
Additionally, always consult the manufacturer’s instructions for your specific paint sprayer model, as some may have different recommendations for cleaning and maintenance.
Can you run water through a paint sprayer?
Water can be used to clean some types of paint sprayers.
But it is important to check the manufacturer’s instructions for your specific paint sprayer model to ensure that it is safe to use water.
Water-based paints can be cleaned with water, but you should use warm water and clean the sprayer immediately after use to prevent the paint from drying and clogging the nozzle.
It’s also important to make sure that the sprayer is completely dry before storing it, to prevent rust or other damage.
On the other hand, some types of paint sprayers, such as airless and HVLP sprayers.
Are not designed to be used with water, and they can damage the internal components of the sprayer.
It’s important to note that using water to clean a sprayer that is not designed for it can cause rust and corrosion.
Or other damage to the internal parts and could void the warranty of the sprayer.
How do you clean a handheld paint sprayer?
To clean a handheld paint sprayer, you will need to follow these steps:
- Unplug the sprayer and disassemble it according to the manufacturer’s instructions. This may involve removing the nozzle, hose, and other parts.
- Clean each component separately using a cleaning solution specifically designed for the type of paint you were using, or a mild detergent and warm water. Scrub the parts with a brush or a cloth to remove any dried paint.
- Rinse each component thoroughly with warm water to remove any remaining cleaning solution or paint. Be sure to shake out as much water as possible.
- Dry each component thoroughly with a clean cloth or allow them to air dry before reassembling the sprayer.
- Once all parts are completely dry, reassemble the sprayer and store it in a dry place to prevent rust or other damage.
It’s important to always follow the manufacturer’s instructions for your specific paint sprayer model, as some may have different recommendations for cleaning and maintenance.
Also, it’s important to clean the sprayer thoroughly after each use to prevent paint from drying and clogging the nozzle, and to prevent rust or other damage to the internal components.
FAQ’s of How to clean a paint sprayer
Final Thoughts on How to clean a paint sprayer
Now that you have learned how to clean a paint sprayer, you will no longer have to worry about the time it takes to clean one.
Or the potential damage that can occur when you leave paint in the unit.
However, if you do find yourself in a situation where you have painted too long, it’s always a good idea to give the unit a quick wipe down with a cloth and some warm water.
If you have any tips which can be helpful to other people and new information for me drop a comment so others can get help from it too.
Also, view the FAQs which might come to your mind as a newbie. Those can also help you guys to understand the process.

Matthew Edward is a professional painter who loves to paint and wants to share useful tips and tricks which he had learned in many years of experience in painting. He also used many products that can be used for painting he has tried and tested each and every product to give an unbias opinion about it in his review. This blog is very useful for those newbies who want to learn painting without making mistakes.


