Are you interested in learning how to paint your house or car with that handy spray gun you’ve got tucked away in a corner?
Well, I’m glad you’re here because I will show you step by step how to paint faster and recycle all that expensive material you might be using for conventional means.
If using this spray gun makes sense for what you want to accomplish then I’ll demonstrate how it works so that next time, when the job has to be done, it won’t be such a hassle.
You thought paint guns were just for coloring your walls or having a mess-free car?
Think again! These innovative tools can also be used to effectively repurpose expensive materials!
If that sounds like something you’re interested in, watch this demonstration.
And learn how to make the most out of your money whether you’re aiming to fix up a car or artistically enhance your sculpture garden.
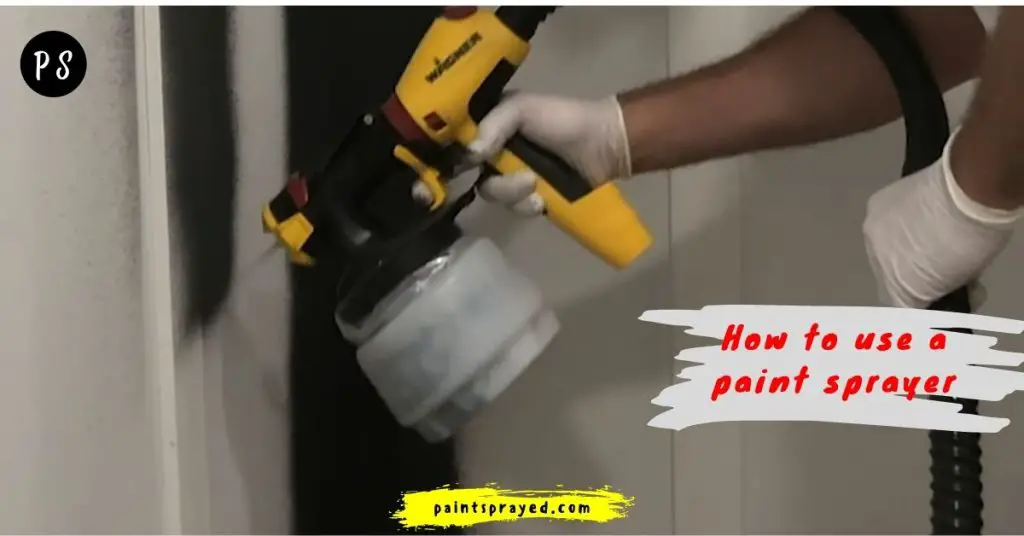
How to use a paint sprayer?
First of all, you must have all the things
To make sure your paint project goes as smoothly as possible, it’s a good idea to make sure you have the following supplies on hand.
Spray Paint. We all know how much of a daunting task painting your house can be. While we admire the DIY spirit.
It is also easier to just leave it to the experts who have access to professional machines and equipment.
Prepare the area first
Initially, you have to prepare the area first which you want to paint or wonder to paint it.
When preparing an area, it’s really important to prepare it right.
The last thing you want is to have a brush or roller get caught between two pieces of furniture (which actually happens often!).
This can be dangerous, and messy and it gets super frustrating. So, if you don’t want any accidents to occur, I suggest getting all the furniture out of the room.
When getting ready to paint, make sure you’ve covered every surface with some kind of protection.
Some options include taping off ceilings and drop cloths, plastic sheeting like painting tarps, and rosin paper.
Plastic sheeting will stick to the carpet, while the other two can be used on any surface you want to prevent paint from touching.
Make sure to cover power outlets, floor moldings, and window treatments as well in order to get a professional finish.
The next step is to prepare the paint
Congratulations on completing the previous steps successfully! First, you need to make sure to gather all the necessary equipment.
This includes a paint sprayer, a mister, and at least five different kinds of paint along with their corresponding paint trays.
Next, figure out where you’re going to work as well as set up your station.
Make sure you have an area that has enough light and ventilation so you don’t get sick from overusing fumes or breathing in certain chemicals.
After that, it’s time to know how your device works; practice makes perfect!
Watch some videos online and ask others who know how to use one if there are any specific tips they could give you. Then just go forth and get painting.

Just like mixing any hand-poured paint job, you will need to mix the paint in your sprayer well.
Make sure there are no clumps of paint in the can or else these clumps could mess up your fine finish on top of the wall when you’re spraying lightly.
Just run a little thinner through that nozzle if you need to help get that stuff flowing smoothly through the tip again.
Now it’s time for us to move on and learn how to use our sprayers correctly.
Practice on some surfaces before working on a project
It is important to always read the instructions for your paint sprayer before using it as you could cause damage if you do not. Don’t use cans of spray paint inside.
You can find a primer and top coat that compliments most types of surfaces from hardware stores or you can buy aerosol sprays.
Now they include their own sealant, making them ready to go when applied directly onto a surface.
Now I am going to share a few tips with you guys that I got from my experience. Before starting on the project, you have to keep these things noted down and checked.
To get maximum results and satisfactory finishing.
- When it comes to painting a wall, there are many key things that have to be done properly in order to get the most professional results. You can’t just take an old brush and a paint pot and expect things to turn out shiny and smooth. We’re here today with these pointers on making sure your next painting project goes as smoothly as possible because that’s what we’re all about – helping you realize your projects no matter how big or small they may be.
- For best results, hold the sprayer 8-12 inches away from the surface. Spraying this close will give you a sandy-looking finish and holding it too far away will cause drips and runs that can’t be removed without wasting a lot of material.
- Paint sprayers all have different personalities. Some of us are very chatty, while others are very quiet and shy. The most important thing is to learn how to work with the types that you don’t initially get along with because sometimes it’s those who are quieter and more reserved who end up being the most passionate and hard-working ones out there!
- Take your sprayer out for a spin and start working on that wooden platform. Watching YouTube videos might help if it comes to it. Just get used to how the gun feels in your hand and you’ll do fine.
- If you don’t have any spare surfaces that need spraining, then it’s always a good idea to test your sprayer out before painting up on the surface you want to work with. It can be super annoying to have paint splattering all over your hard work. I suggest you get some spare pieces before working on the actual project to avoid any mishaps.
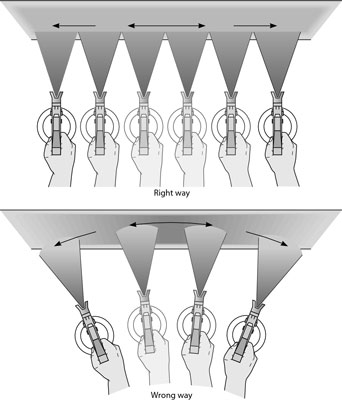
- When applying paint or stain to your project, it’s best to use small amounts at a time and to always apply inconsistent, straight strokes which overlap the last stroke at least halfway. This will provide a uniform coating throughout.
- Keep a rag nearby to wipe the tip of your spray nozzle occasionally, as this will assist in preventing paint buildup. This could save you time and money in the end by ensuring that the design of your piece is left intact, with paint being distributed properly instead of leaking out or splattering everywhere! So, make sure you have a rag with you at all times when using your sprayer because an extra 10 seconds wiped off the tip of your nozzle may save you hours upon hours of clean-up if things go wrong.
Be calm and start painting
Don’t rush in any process which I have mentioned earlier or the process I am gonna explain further in this post because rushing will only create a mess for you.
And if you are a newbie then your must should be in a relaxed state before painting the surface or object which you want.
If an amateur creates fuss then he/she becomes disappointed more than the average person who paints often or has painted quite many objects.

The best way to get a steady pace going when painting is by making sure not to rush through the job.
Always take your time, and make sure you don’t miss any details because it’s those small things that give your painting a better visual appearance.
When it comes to painting corners, it may be hard to avoid any paint build-up since they are part of the main surface.
But try to avoid getting carried away as much as possible or else you’ll end up taking more time than expected.
Remember, work with an established pattern for at least the duration of the paint job so your project stays consistent throughout!
After finishing look from all angles
After some thought, you’ve finally decided to paint the walls in your family room a lovely shade of light green.
While you were doing so, you couldn’t help but stop and look back occasionally at the walls to check whether.
Or not everything was blending together well and blending nicely with the coziness that this room once possessed.
It looks as if your previous painting endeavors have paid off.
Now the cleaning process begins
When you finish spraying it’s important to clean your gun. Our how-to article has everything you need to know.
Alternatively, the manufacturer’s user manual will give you extra details on how to properly clean and store your tool for next time.
Learn how to do that here or check out the manufacturer’s guide to using your tool – it will tell you all about properly ensuring that your product maintains its luster.
Now comes the debate on paint sprayers vs rollers
Sometimes you have to use both! If you are painting a rougher surface, back-brushing may be necessary.
This will help work your choice of color into any cracks, crevices, or engrained dirt that your low-pressure sprayer may not cover as well.
Back-brushing is simply going over the surface with a roller or brush after it has been painted in order to ensure the coverage is even and solid.
It’s important to do this while the paint is still wet so avoid getting some of this moisture on yourself (this explains why you should wear old clothes when doing this!)
Not only will back-brushing help to get a sturdier finish but it can also save time and money if done correctly.
This is one of those questions that would be better answered by someone who has used a paint sprayer before. I have used a paint roller and an airbrush, but never a sprayer.
The basic principle is the same in all three cases. you paint an object, and the paint adheres to the object.
You should not have to do the same amount of work to paint the object whether you spray or roll.
The amount of time it takes to paint an object is the same regardless of what type of paint applicator you use.
Rolling takes more time to cover the same amount of area than spraying does. Rolling uses more paint than spraying. Spraying is generally better to finish wood.
Rolling can leave brush strokes in the wood, which you might not want. If you are spraying, you’ll want to use special paint for the object you are painting.
It does not have to be expensive, but it does have to be made for use with a sprayer. It will be smoother and have a better finish.
Can a beginner use a paint sprayer?
Yes, a beginner can use a paint sprayer, but it may take some practice to become proficient with it.
It’s important to read the instruction manual carefully and to practice on a scrap piece of material before using it on a project.
Additionally, it is important to wear proper protective gear and to work in a well-ventilated area when using a paint sprayer.
Do you have to mix paint for a paint sprayer?
It depends on the type of paint sprayer and the type of paint being used.
Some paint sprayers require that the paint be thinned before it can be used, while others can handle the paint in its thicker, unthinned form.
Some paint sprayers also have the option of adjusting the pressure or fan pattern to accommodate thicker paints.
It’s important to consult the instruction manual for your specific paint sprayer and to follow the manufacturer’s recommendations for preparing and using the paint.
How do you use a paint gun sprayer?
Using a paint sprayer, also known as a paint gun, typically involves the following steps:
- Prepare the surface to be painted by cleaning it thoroughly and making any necessary repairs.
- Mix the paint according to the manufacturer’s instructions and pour it into the paint sprayer’s container.
- Adjust the paint sprayer’s settings according to the type of paint and surface being painted.
- Put on safety gear such as a respirator mask and goggles to protect yourself from paint fumes and overspray.
- Begin spraying by holding the gun at a consistent distance from the surface and moving in a steady, back-and-forth motion. Overlap your passes slightly to ensure even coverage.
- After painting, clean the paint sprayer according to the manufacturer’s instructions to prevent clogs and prolong the life of the sprayer.
- Always check the instruction manual of the paint sprayer you own, as different models may have different instructions and settings.
It is also important to practice on a scrap piece of material before using it on a project and work in a well-ventilated area to avoid inhaling paint fumes.
Do you add water to paint when using a spray gun?
It depends on the type of paint and the type of spray gun being used.
Some paints, such as latex or water-based paints, may require thinning with water before they can be used with a spray gun.
This is to ensure that the paint can flow through the spray gun’s nozzle without clogging it.
However, some types of paint, such as oil-based paint, should not be thinned with water and should be used as is.
It is important to consult the instruction manual for your specific paint and spray gun, and to follow the manufacturer’s recommendations for preparing and using the paint.
It is also recommended to do a test spray on a scrap piece of material before starting the actual project.
Ensure the paint is thinned to the right consistency and the spray pattern is adequate.
What do you mix with paint for a paint sprayer?
When using a paint sprayer, it is important to mix the paint with the appropriate thinner or reducer to ensure proper spray consistency and to prevent clogging of the sprayer’s nozzle.
The specific thinner or reducer recommended by the paint manufacturer should be used, as different types of paint require different types of thinner.
For example, oil-based paint should be thinned with mineral spirits, while latex paint should be thinned with water.
Always follow the manufacturer’s instructions for the correct ratio of paint to thinner.
How do you use a paint gun sprayer?
Using a paint gun sprayer typically involves the following steps:
- Prepare the surface to be painted by cleaning it thoroughly and making any necessary repairs.
- Mix the paint with the appropriate thinner or reducer according to the manufacturer’s instructions.
- Pour the paint mixture into the paint sprayer’s container.
- Adjust the sprayer’s nozzle to the desired spray pattern and pressure.
- Test the spray pattern on a piece of scrap material or cardboard to ensure that the paint is spraying evenly.
- Begin spraying the surface to be painted, starting at the top and working your way down. Hold the sprayer about 8-12 inches away from the surface, and move in a back-and-forth motion, overlapping each pass slightly.
- Allow the paint to dry completely before applying any additional coats.
- Clean the sprayer thoroughly after use according to the manufacturer’s instructions to ensure it stays in good working condition.
Keep in mind that the instruction may vary depending on the specific paint gun sprayer you are using, so it’s always best to refer to the manufacturer’s instructions for detailed guidance.
FAQ’s of How to use a paint sprayer
Summary of How to use a paint sprayer in 2023
Thank you for reading my blog post on how to properly use a spray gun.
I hope that you found the information to be helpful and that you are now better equipped to create your next project!
If you have any questions, comments, or suggestions, please feel free to share them with me below. I always love hearing from you.
And ready all the time to clear out your confusion and doubts from my experience and knowledge.

Matthew Edward is a professional painter who loves to paint and wants to share useful tips and tricks which he had learned in many years of experience in painting. He also used many products that can be used for painting he has tried and tested each and every product to give an unbias opinion about it in his review. This blog is very useful for those newbies who want to learn painting without making mistakes.


