Stenciling a design on your home can give it personality and character, whether you chose to stencil the front of your house or even a window, the results can be quite stunning.
Some may think that it requires expensive devices and expert abilities — but it’s not true at all! Stenciling has been around for years.
And nowadays anyone can do it very easily provided they have the right tools.
In this article, I will show you how to set up everything you need in order to begin stenciling on a wall of your choice.
Today I will teach you with my experience how to stencil with a paint sprayer. It is to be noted that if can be a little difficult for the newbie to paint the first time.
But with this post of mine, he/she can paint wooden stencils or any other surface easily by following the steps explained below.
Getting started with spray paint can be quite confusing, but that’s why I’m here to help!
So, wipe the dust off of your old projector and prepare yourself a relaxing cup of coffee.
Because this guide will walk you through all the steps from picking up your first gun to giving your house that perfect makeover.
How to stencil with a paint sprayer?
What is a stencil and why are they used?
Spray templating stencils are your saving gem if you’re impatient to redo your home but you can’t afford a proper wall decal or poster.
It’s really easy to paint patterns onto surfaces that would otherwise take hours and cost too much.
To save time and effort, many types of stencils are sold commercially.
Well thought out in terms of features, they’re often laser cut, which makes for sharper pattern edges — a perfect example being the Herringbone Wall Stencil from STENCIL.

Most suitable spray gun for stencil
I am gonna suggest to you the most suitable paint sprayers which I used and tested for painting stencils and got great results. When it comes to spray painting, you have a lot of options.
The best way to accomplish the best results is by using the right tool for the job while still achieving your desired style and level of quality.
Here are three important things to keep in mind when it comes to spray paint.
If you’re looking for a sprayer that will help you turn your best ideas into reality and allow you to bring any painting project to life, it’s important to choose a suitable tool.
The first thing to know is that what sets the best sprayers apart from those available in common retail outlets is that they all derive their power from HVLP technology.
Which minimizes overspray and requires less coating.
You also need a sprayer with an appropriately sized nozzle for your coating – if not, make sure it’s compatible with other tip sizes.
A larger reservoir will also ensure a greater degree of freedom as you complete your project.
Paint for stencil
Now I am gonna explain which paint is best for stencils according to my experience. So, stay in touch with me.
There are many factors to take into consideration when choosing a type of paint for a particular project.
Keep in mind that you’re painting a wall surface, are you looking for something flat that allows the texture of the wall to show through or would you prefer a glossy finish?
Would you like to engage attention with bold colors or a more neutral palette? Also, think about longevity and how much time and energy it will take you to finish the project.
When stenciling, you have to pick the right paint. Go with latex paint as it’s easier to touch up if you make an error while painting or outlining a shape.
Plus, using latex means you’re less likely to create a flaky paint job that will leave any potential “flashing.”
From there, it’s all about picking the right color and applying two thin coats of durable painter’s tape and latex over your model.
One can use Montage DecoArt Signature Luminaire Eco-Friendly Interior & Exterior Painting for their stenciling needs as it is low sheen and available in 16 colors.
Reminder: If using stencils for your next home project and you want a nice.
Clean look to your paint job then make sure that you use high-quality spray paint such as Binks and not cheap stuff from the hardware store.

Is spray adhesive required?
You apply spray adhesive, which allows you to reposition it as needed. It’s also better than masking tape, as it will stick directly to the surface with ease.
However, do note that some paint spray adhesives are meant to be used only in certain weather conditions so make sure you can state this on the label.
Spray adhesive is a must-have when you need to make a stencil quickly.
Double-sided tape, on the other hand, will not work at all when it comes down to getting your stencil absolutely flush with the surface. That’s why spray adhesive is pretty much your only option.
Tools required to stencil on a wall
Before starting with the work. Make sure you have these things with you so that you can enjoy the process of painting rather than messing things up and getting a bad experience.
So, in order to save you guys from bad experiences so that you peeps don’t face disappointment after finishing.
- A Paint sprayer
- The fluid nozzle of suitable size
- Your preferred stencil
- Stencil paint
- Sit sticks to stir the mixture properly
- Spray adhesive can be a good thing on the bucket list
- Water
- Dish detergent
- Bucket to mix things up
- Old cloth or towel to clean the mess
- A drop cloth
- Old cardboard box
- Protective gear should be with you: goggles, respirator, and mask, etc.
Preparation before project
Planning is a crucial step in the painting process.
Make sure to read all directions supplied by the paint manufacturer and other relevant documentation before beginning the project to ensure your job goes as smoothly as possible.
It’s important to make sure you have everything you need before starting a project.
So please make sure you have your tools and complete the following tasks before proceeding to the next section of this module.
Testing the sprayer before use
It’s always a good idea to test out something new before actually using it, such as our stencil and paint sprayer combination.
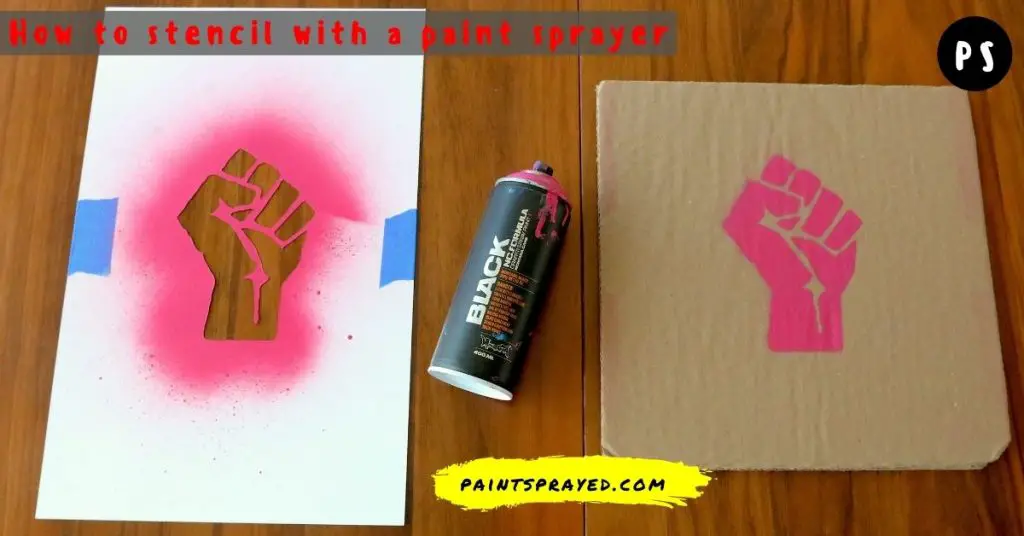
In order to make sure you’ll get the look that you’re going for, set up the stencil on some flattened cardboard first.
Then apply spray adhesive onto the back of your stencil and position it onto the cardboard. Be sure to press it firmly in place so that it doesn’t come off later when you need it most.
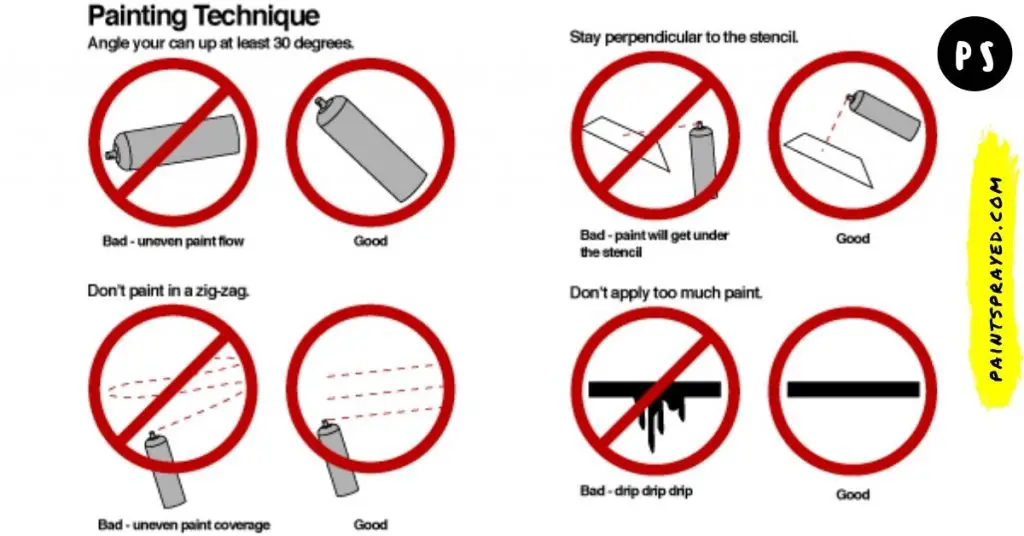
One should, for example, start the stroke of a paint sprayer about 12 inches away from the surface you choose and complete the stroke without stopping.
This will allow an even coat without any pooling from being too close.
If you want to test out the patterns beforehand, I recommend doing it on an area other than your wall.
This way, you can experiment with the positioning of your cans or adjust any settings or effects without damaging your wall in any way.
Start to stencil
The stencil should be easy to place after all of your initial spray painting, and it shouldn’t take you long to succeed on the wall once again.
Use more spray or bring the can closer to the wall itself for a darker color in order to disguise any spots that might have been missed.
When stenciling a wall, it is important to make sure that the paint surrounding the area of your desired pattern is dry.
This will ensure that you are able to get nice, crisp edges when removing the stencil.
If you aim for a pattern that repeats (like dovetails for example), this step becomes crucial as it will prevent you from accidentally painting areas of your wall on top of each other.
Cleaning process
When you’re finished stenciling, clean your paint sprayer as soon as possible. If the stencil is reusable, clean that too.
Make sure both are dry before storing them so you can use them again on your next project.
And also Make sure to tidy up any buckets, clothes, and sticks used to clear the floor.
Put clothes back into your laundry baskets, level or reposition furniture you’ve moved, and make sure that no tools are left lying around in the workspace of other team members.
How do you spray paint with stencils without bleeding?
To prevent bleeding when spray painting with stencils, you can try the following techniques:
- Use spray paint that is specifically designed for stenciling, as these are less likely to bleed.
- Apply a spray adhesive to the back of the stencil before placing it on the surface you will be painting. This will help hold the stencil in place and prevent paint from seeping under it.
- Apply a thin, even coat of paint using light, back-and-forth motions. Avoid holding the spray can too close to the stencil and do not apply too much pressure.
- Use a small paintbrush or foam brush to touch up any areas where paint may have bled under the stencil.
- After removing the stencil, allow the paint to dry completely before applying any additional layers or colors.
By following these tips you can prevent paint bleed and achieve a clean, professional-looking stenciled design.
Does spray paint work for stencils?
Spray paint can be a great option for stenciling because it allows for quick and even coverage of large areas.
However, it can be more difficult to control the amount of paint that goes under the stencil and prevent bleeding, compared to using a brush or roller.
To get the best results with spray paint and stencils, it’s important to use spray paint that is specifically designed for stenciling, as these are less likely to bleed.
It’s also important to use a light touch and hold the spray can at a moderate distance from the stencil, to avoid applying too much paint at once.
Additionally, using a stencil spray adhesive to hold the stencil in place is also a good option to prevent bleeding.
It is important to test the spray paint and stencil on a small area before starting your project to check for any potential issues.
By following the tips mentioned before, you can achieve a clean, professional-looking stenciled design using spray paint.
How do you get crisp lines when stenciling?
To get crisp lines when stenciling, you can use a stencil brush or roller with a dense foam tip, and make sure to use light, even pressure when applying paint.
You can also use a stencil adhesive spray to secure the stencil in place and prevent paint from seeping under the stencil.
Additionally, you can use a small, fine paintbrush to touch up any areas that may have smudged or bled outside of the stencil lines.
Finally, make sure to clean the stencil after each use to remove any paint build-up, and store it properly to prevent it from getting bent or damaged.
Do you peel stencil when paint is wet or dry?
It is generally recommended to remove a stencil while the paint is still wet.
This is because the paint is more pliable and less likely to smudge or smear when it is wet, which can help to maintain the crisp lines of the stenciled design.
Additionally, if the paint is still wet when you remove the stencil, you can use a small, fine paintbrush to touch up any areas that may have smudged or bled outside of the stencil lines.
If you remove the stencil when the paint is dry, it is more likely to pull up the paint or smudge the design, resulting in a less crisp, clean look.
However, if you are working with a stencil that is reusable it’s better to wait for the paint to dry as it will be easier to clean.
FAQ’s of How to stencil with a paint sprayer
Verdict on How to stencil with a paint sprayer
I hope you enjoyed our blog about stenciling with a paint sprayer. With this knowledge, I know that you can make the most of your home decor projects by using stenciling with a paint sprayer.
So, what are you waiting for? Use stenciling with a paint sprayer to add some personality to your home today.
Stencils have been around for centuries, but their use of them in decorating walls and furniture has been embraced by many people in the last few years.
Some professional decorators have taken stenciling to a new level, using stencils to create custom designs on furniture and walls that go far beyond what you’d see in stores today.

Matthew Edward is a professional painter who loves to paint and wants to share useful tips and tricks which he had learned in many years of experience in painting. He also used many products that can be used for painting he has tried and tested each and every product to give an unbias opinion about it in his review. This blog is very useful for those newbies who want to learn painting without making mistakes.


